Posts

Showing posts from March, 2013

Prevent Man in The Middle attack

Image
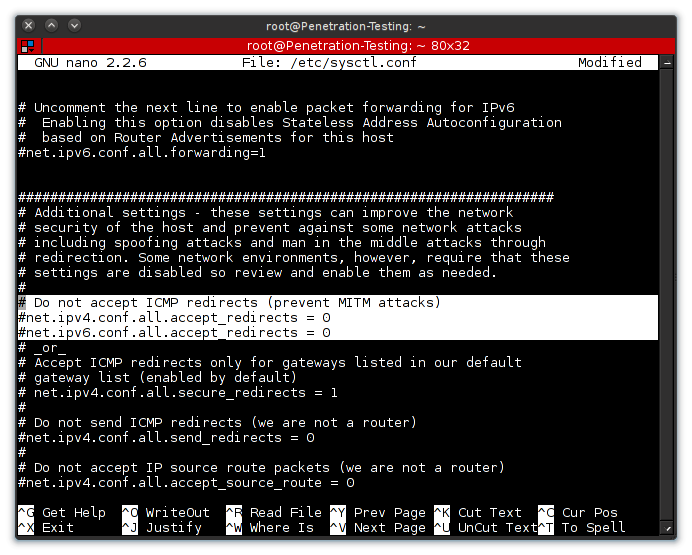
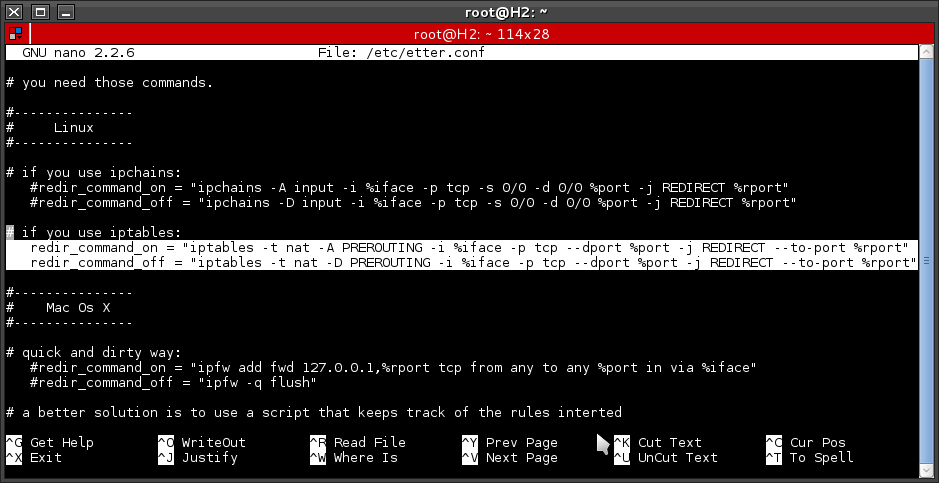
Seperti yang kita ketahui, tidak ada system yang 100% aman dari serangan. salah satu contohnya akan saya paparkan untuk mencegah terjadinya serangan terhadap sistem operasi yang kita gunakan. dalam postingan ini saya akan coba jelaskan bagaimana cara menghindari serangan MITM (Man In The Middle) yang marak di lakukan attacker saat berselanjar di sebuah Local Area Network (LAN). First Step : edit file sysctl.conf # nano /etc/sysctl.conf selanjutnya cari bagian : # Do not accept ICMP redirects (prevent MITM attacks) Perhatikan bagian yang saya blok kemudian  hapus tanda " # " dari baris berikut : # net.ipv4.conf.all.accept_redirects = 0 # net.ipv6.conf.all.accept_redirects = 0 menjadi net.ipv4.conf.all.accept_redirects = 0 net.ipv6.conf.all.accept_redirects = 0 Save Ctrl+x = y selanjutnya menjalankan file  sysctl # sysctl -p -p = Read values from file =)) Regards : Hidemichi-Hiroyuki a.k.a [H2]

S.E.T and Ettercap In Facebook hacked [Part I]

Image
Selamat malam para attacker =). kembali saya menulis sebuah aksi kejahatan dengan tujuan membajak sebuah account baik dari situs-situs jejaring sosial maupun situs-situs tertentu seperti BRI, BNI, BRITAMA, serta Bank-Bank daerah lainnya. tapi kali ini tidak lah tindakan kriminal tingkat tinggi karna kita tidak melakukan pembajakan atas account-account dari bank-bank yang saya sebut diatas. lalu, mengenai apakah ini. mari kita lihat bersama-sama :) Equipments: 1. Ettercap 2.  Social Engineer Toolkit / SET Disini OS yang saya gunakan adalah sebuah Operation System yg di dedikasikan untuk mereka yang gemar melakukan aktifitas penetrati and testing terhadap sebuah system yaitu, Kali Linux yang berbase Debian Wheezy =)). jadi kedua equipment diatas secara default telah terinstall. saya anggap kalian sudah memiliki kedua peralatan diatas =) Tahap pertama : mengatur configurasi file etter.conf : # nano /etc/etter.conf kemudian saya mencari bagian iptables dalam kolom Linu

add-apt-repository for kali linux

Image
add-apt-repository is a script which adds an external APT repository to /etc/apt/sources.list or a file in /etc/apt/sources.list.d/ in this distro we did not find any such file. so, there are several stages to the addition of this file. script: #!/bin/bash if [ $# -eq 1 ] NM=`uname -a && date` NAME=`echo $NM | md5sum | cut -f1 -d" "` then ppa_name=`echo "$1" | cut -d":" -f2 -s` if [ -z "$ppa_name" ] then echo "PPA name not found" echo "Utility to add PPA repositories in your debian machine" echo "$0 ppa:user/ppa-name" else echo "$ppa_name" echo "deb http://ppa.launchpad.net/$ppa_name/ubuntu maverick main" >> /etc/apt/sources.list apt-get update >> /dev/null 2> /tmp/${NAME}_apt_add_key.txt key=`cat /tmp/${NAME}_apt_add_key.txt | cut -d":" -f6 | cut -d" " -f3` apt-key adv --keyserver keyserver.ubuntu.com --recv-keys $key rm -rf /tmp

Etherwall for Prevent Man In The Middle Attack

Image
Hanya untuk antisipasi saja, terkadang kita juga tidak luput dari serangan-serangan seorang attacker, walau bagaimana pun kita tidak dapat menghentikan serangan tersebut akan tetapi kita hanya berusaha membuat attacker kewalahan menyerang komputer kita =)) Equipments: 1. Etherwall download dengan perintah # git clone https://github.com/rndc/etherwall.git setelah download selesai kemudian masuk ke directory etherwall # cd etherwall beri permision file install.sh dengan perintah # chmod 777 install.sh selanjutnya tahap installasi. # ./install.sh tekan ENTER atau SPACE hingga muncul pertanyaan seperti ini: Finish =)) for run Regards Hidemichi-Hiroyuki a.k.a [H2]

Theme on Kali Linux

Image
Changing the theme is generally very popular, especially the gnome users Backtrack Linux-based Ubuntu 10.04 and may be very easy to change the theme. but what about the Kali-Linux based Linux Debian Wheezy. Okay, we'll discuss how to replace the Themes on operation system Kali Linux. See the initial Theme is a theme that I use Default theme: equipment :  gnome-tweak-tool Download Themes (GTK-3) First Step : install gnome tweak tool root@kali:~# gnome-tweak-tool if the installation is complete then we open gnome-tweak-tool root@kali:~# gnome-tweak-tool Next klick Tab Theme : See the Tab Window Theme, Theme Icon and GTK + Theme I still use (the default) as my theme. The next close Gnome-Tweak-tools. let's change the theme that we download and I think you have finished downloading it :) then extract this theme coincidence here I use *. zipped and I put it on the Desktop root@kali:~/Desktop# unzip -x dorian-theme.zip fini

Update Hashcat For Last Version

Image
Salah satu aksi seorang Hacker adalah mendapatkan sebuah password, ya begitu lah hacker bekerja, dgn imajinasi yang tinggi teknik serta pengalaman-pengalamanya seorang hacker dapat mengetahui sebuah password yg di Encrypt sedemikian rupa agar tidak di ketahui oleh orang lain, hmm tapi saya bukan lah hacker, saya hanya Linuxer :) Linux Enthusiast. oke, kemarin saya mencoba tools crack password yg kemarin juga sudah saya bahas, yaitu Hashcat, tapi ada sedikit masalah saat mengeksekusi toolsnya : setelah dilihat dari errornya hashcat ternyata menyuruh mengupdate dirinya ke versi terbaru :) langsung saja download hashcat-0.42 root@H2:~# wget -c http://hashcat.net/files_legacy/hashcat-0.42.7z setelah download, kemudian extract file nya. root@H2:~# 7z x hashcat-0.42.7z NOTE : bagi yg belum ada tools buat extract file *.7z silahkan di install dulu root@H2:~# apt-get install p7zip oke, selanjutnya remove directory hashcat root@H2:~# rm -rf /pentest/passwords/hashca

Install VMware Player On Kali Linux

Image
I will discuss briefly how to install vmware player on stage at the operating system kali-linux, which previously I had a problem when running vmware and raises the error " C header files matching your running kernel were not found " Download Vmware Player last version here after downloading the file I suggest you not to install it directly on your KLINUX operating system, it is better to avoid mistakes please installl packet header follows: # apt-get install build-essential linux-headers-`uname -r` after complete then run the file vmware player that we downloaded : # /your-path/VMware-Player/FILE please wait a second until vmware opened The next stage of the installation do to finish and you can directly run vmware player =)) Regards : Hidemichi-Hiroyuki a.k.a [H2]

About

.:About Blog:. As a condition of your use of this blog , "http://h2-exploitation.blogspot.com/" guarantee that you will not use this blog for any purpose that is unlawful . accordance with the Uniform Commercial Code ( UCC/2/2-316 ) , this product is equipped with a ' no warranties expressed or implied ' provide information that is contained in the " as is" and no warranties can be in by people. or continue using it beyond the lab environment " test " you can be considered dangerous and illegal. @ 2013 no replication writing , content , videos are allowed without written permission . .:About Author:. Hidemichi-Hiroyuki a.k.a [H2] contact: aka_h2[at]linuxmail[dot]org Phone Number : - Country : INA Facebook:  fb./l30ckx Facebook Fans Page: / ArtOfExplo1t Twitter : @Dr_Natada College: Academy of Computer Information Management Thank you for visiting our blog. I hope it's useful. REGARDS.

Scripting bashrc console

Image
Hallo all =)) today i trying for learn to scripting on bashrc. This just makes the display console to be interesting, okay, just on my console terminal display using the default script: then I started to edit some bashrc file which is in the root directory. # nano .bashrc subsequent search this section: PS1="\[\e]0;${debian_chroot:+($debian_chroot)}\u@\h: \w\a\]$PS1" then replace with this: ┌─( $TXTGRN\u$TXTRST ) - ( $TXTPUR$K$TXTRST ) - ( $TXTCYN\w$TXTRST )\n└─>  then the result will be like this: then I replace this: ( $TXTPUR$K$TXTRST ) to be ($(uname -r -n)) to display the version of the kernel: And I replace this: ( $TXTCYN\w$TXTRST ) to be \n \[\033[01;34m\]\w\[/\033[00m then the result will be like this: you can also use the script just as this: ┌────[\u@\h]────────────────────────────────────────[\t]────┐ \n └───>(${PWD}) \$ Then the result will be like this Author By: Hidemichi-Hiroyuki a.k.a [

Chromium can not be run as root

Image
Masalah ini kerap terjadi apabila kita menjalankan Chromium dengan user sebagai root krn pada umumnya masalah tersebut sering di alami pengguna Backtrack karena usernya langsung memberi hak akses root. bagaimana cara mengatasinya ? dan pagi ini saya memberi saran yang sangat sederhana. For Error : langkah selanjutnya copy bagian --user-data-dir. selanjutnya jangan close windows tersebut, keudian buka terminal dan ketik # nano /usr/bin/chromium Next, cari bagian ini  exec $LIBDIR/$APPNAME $CHROMIUM_FLAGS "$@" lalu pastekan  --user-data-dir tepat di sebelah kalimat diatas hingga tampak seperti gambar berikut kemudian save Ctrl+x - y (enter) Finish :) sekarang Chromium berhasil di akses sebagai root =)) Regards : [H2]